PLUG Unity Guide
Quick Start
Download latest version
1. Project settings
In order to use PLUG SDK, development environment should be set as following from unity..
From unity menu, click on Asset > Import package and select NaverCafeSDK-x.x.x.unityPackage file you have downloaded from Custom Package dialog box.
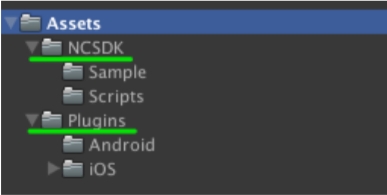
If you click on Import from Custom Package dialog box, NCSDK folder and Plugins folder are generated.
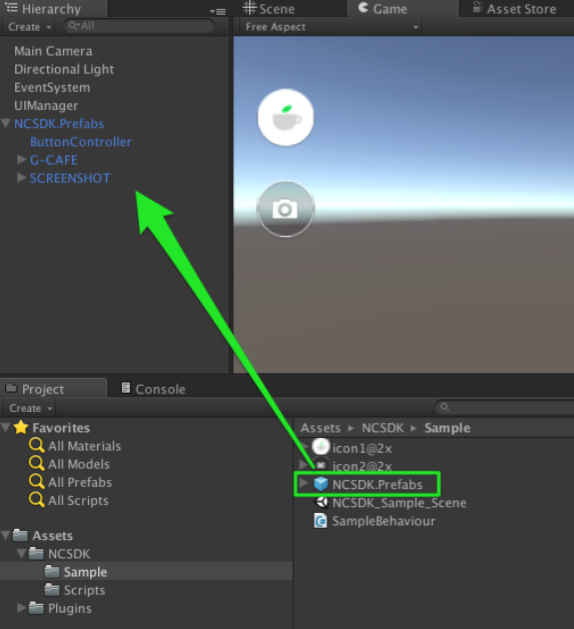
Drag the NCSDK.Prefabs in Sample folder in NCSDK folder to desired scene. Button that is provided as default in plugin is generated.
Enter the cafe ID, client ID, and client secret to GLinkConfig file in Scripts folder in NCSDK folder.
Run PLUG SDK button is provided as default in PLUG SDK for development. It can be directly generated. Sample code is written in SampleBehaviour.cs file.
Refer to GitHub archive for details about PLUG SDK for each operating system..
2. Initialization
Initialize PLUG SDK according to the language that is being supported, as explained below.
2.1 PLUG SDK initialization (only supports Korean - Naver cafe)
When initializing PLUG SDK that only supports Korean, initialization information should be set and items related to foreign language support in script file should be processed as note.
Apply initialization information setting to GLinkConfig.cs file in Scripts folder in NCSDK folder.
NaverLoginClientId: Client ID received when registering application on the login developer center using Naver ID
NaverLoginClientSecret: Client secret received when registering application on the login developer center using Naver ID
CafeId: Cafe ID received by opening a Naver café
Items that are related to foreign language support in script file for each operating system in Script folder in NCSDK folder are processed as note. Following items in GlinkAndroid.cs file, which is the script file for Android, are processed as note.
Following items in GlinkiOS.cs file, which is the script file for iOS, are processed as note.
2.2 PLUG SDK initialization (only supports a foreign language)
When initializing PLUG SDK that only supports foreign language, initialization information should be set and items related to foreign language support in script file should be removed from note.
Apply initialization information setting to GLinkConfig.cs file in Scripts folder in NCSDK folder.
NeoIdConsumerKey: Consumer key received by opening the community
CommunityId: Community ID received by opening the community
Items that are related to foreign language support in script file for each operating system in Script folder in NCSDK folder are removed from note.
Following items in GlinkAndroid.cs file, which is the script file for Android, are removed from note.
Following items in GlinkiOS.cs file, which is the script file for iOS, are removed from note.
3. Start PLUG SDK
Run PLUG SDK after initialization is complete.
GLink.cs GLink.cs file is a script file where there is a method for controlling PLUG SDK.
3.1 executeHome() method
It is a method for starting executeHome() method plugin.
3.2 executeArticlePost() method
executeArticlePost() method is used for opening article post screen. Deliver article ID to parameter.
4. Additional iOS setting
When developing iOS game, following items should be set additionally.
4.1 Vertical mode setting
When developing game that is carried out in vertical mode, NCSDKManager.setOrientationIsLandscape properties for NCSDKUnityManager.mm file in NCSDK/Plugins/iOS folder should be set as No.
4.2 .bundle file link
In unity 5.4.0f3 version or above, .bundle file is not linked when building iOS application. You should select iOS from Select for plugin to link the NaverAuth.bundle file and NaverCafeSDK.bundle file.
4.3 Xcode setting
Development environment should be set as following in XCode.
Add -ObjC option to Other Link Flags from Build Settings.
Add the following library to Link Binary With Libraries on Build Phases. Set the Status of the library to be added to Required.
MobileCoreServices.framework
SystemConfiguration.framework
MediaPlayer.framework
AVFoundation.framework
CoreMedia.framework
AssetsLibrary.framework
Security.framework
ImageIO.framework
QuartzCore.framework
ReplayKit.framework(Set library status to optional)
SafariServices.framework
Webkit.framework
Initialization of a plugin that supports the global community and a domestic Naver cafe
When it supports both global community and domestic Naver cafe, initialization information setting should be applied to GLinkConfig.cs file.
NaverLoginClientId: Client ID received when registering application on the login developer center using Naver ID
NaverLoginClientSecret: : Client secret received when registering application on the login developer center using Naver ID
CafeId: Cafe ID that has been received by opening a Naver cafe
ConsumerKey: Consumer key received by opening the community
ConsumerSecureKey: Consumer secret key received by opening the community
Android
Remove the following items from note in GlinkAndroid.cs file, which is the script file for Android, in order to initialize information in global community and domestic Naver cafe.
iOS
Remove the following items from note in GlinkiOS.cs file, which is the script file for iOS, in order to initialize information in global community and domestic Naver cafe.
Start / Close
Start or close the plugin while a certain tab is selected.
executeHome() method
Start the plugin while home tab is selected.
The following is an example of the executeHome() method.
executeArticle() method
Start the plugin while a certain post is shown in the bulletin board tab.
The following is an example of the executeArticle() method.
Horizontal mode, vertical mode
The plugin supports both horizontal and vertical modes.
Android
In the Android environment, horizontal and vertical modes are automatically applied without having to apply the setting separately.
iOS
In the iOS environment, setOrientationIsLandscape: method is applied for both the horizontal and vertical modes.
The following is an example of using the horizontal mode on the plugin.
The following is an example of using the vertical mode on the plugin.
Adjust transparency
If you adjust transparency using the adjustment slider on the upper left side of the plugin screen, you can use the game and the cafe at the same time.
Android
You can set the setTransparentable() method to enable the transparency adjustment slider in the Android environment.
If you set "true" for the isTransparentable parameter value, you can use the transparency adjustment slider (default value: true).
The following is an example of using the transparency adjustment slider.
iOS
Apply the disableTransparentSlider: method setting to use transparency adjustment slider in iOS environment.
If you set YES as the disable parameter value, you can use the transparency adjustment slider (default value: YES).
The following is an example of using the transparency adjustment slider.
The following is an example of not using the transparency adjustment slider.
Widget
A widget is an element that is automatically displayed on the screen when the fold button is pressed on the plugin. You can use the plugin anywhere in the game by using a widget.
Widget display
You can apply the showWidgetWhenUnloadSDK() method setting in order to display the widget when the fold button is pressed on the plugin.
If you set true on useWidget parameter value, widget is displayed when plug window is folded (default value: true).
The following is an example of displaying the widget.
Run widget
Use the startWidget() method for running the widget.
The following is an example of running the widget.
Close widget
Use the stopWidget() method to close the widget.
The following is an example of force closing the widget.
Default position settings for the widget
When the widget is first run, it is displayed on the center-left part of the screen. If you wish to set the default position settings when the widget is first run, use the setWidgetStartPosition() method.
However, when the widget is run again after the user has moved the widget, the widget will be displayed in the position where the user last moved it.
The following is an example for setting the widget's default position to 20% from top, on the right side of the screen.
Screen capture
You can capture the game screen by pressing the screen capture button on the widget.
Screen capture button
Screen capture function is run by registering widget screen capture button click listener.
Android
In Android environment, widget screen capture button click listener is registered on following callback function.
The following is an example of using screen capture button click listener on GlinkAndroid.cs file, which is the script file for Android.
iOS
In iOS environment, screen capture button click listener is used on GlinkiOS.cs file, which is the script file for iOS, as indicated on the example below.
Screen capture settings
You can use the setUseWidgetScreenShot() method to enable screen capture functionality.
If you set useScreenShot parameter value as true, screen capture button is displayed on the widget (default value: true).
The following is an example of not using screen capture function.
Video recording
If you press the video recording button, you can record the game screen while playing the game.
The video recording function is supported on Android 5.0 or above.
Video recording functionality is supported on iOS 9.0 or above.
Use the video recording function on the widget
If you press the video recording button on the widget, you can record the game screen while playing the game.
Video recording settings
You can use setUseWidgetVideoRecord() method for using video recording function.
If you set the useVideoRecord parameter value as true, the video recording button will be displayed on the widget (default value: false).
Video recording button is not displayed on the widget from the device that is using Android 5.0 or below and iOS 9.0 or below even if you set useVideoRecord parameter value as true.
The following is an example of using the video recording function.
Recording ended callback listener
Tasks that should be processed when video recording is complete are carried out by registering callback listener. Android
Android
In Android environment, recording complete click listener is registered on following callback function.
The following is an example of using the recording ended listener on GlinkAndroid.cs file, which is the script file for Android.
iOS
In the iOS environment, the recording ended listener is registered with the ncSDKWidgetSuccessVideoRecord method.
The following is an example of using the recording ended listener.
Use the video recording function on the game
You can run the video recording button from the game developer to record the game screen.
Start / Stop video recording
Use the startRecord() method to start video recording.
Use stoptRecord() method for finishing video recording.
Video recording callback listener
Callback listener that processes event that is occurred from video recording using the button on game developer should be registered for use.
Android
Android callback listener that is provided in GLinkRecord.cs, which is the script file using video recording function, is indicated as below.
iOS
iOS callback listener that is provided in GLinkRecord.cs, which is the script file using video recording function, is indicated as below.
App scheme processing
When you press the banner image that is displayed on the home screen of the game plugin, you can go to the App scheme to run game functions.
You can register the banner image for moving to the App scheme from the cafe management menu.
Android
In order to use App scheme processing when touch event is occurred in banner image that is moving to App scheme in Android environment, listener should be set in GlinkAndroid.cs file, which is the script file for Android, as indicated below.
iOS
In order to use App scheme processing when touch event is occurred in banner image that is moving to App scheme in iOS environment, listener should be in GLinkiOS.cs file, which is the script file for iOS, as indicated below.
Game ID linkage
By linking the user’s game ID and cafe ID, they can be managed. You can check for the list of linked game ID and cafe IDs from cafe management menu.
In order to link a game ID and cafe ID, the syncGameUserId() method should be used.
The following is an example of linking the game ID and cafe ID.
Change theme color
You can change the theme color of the plugin.
In order to change the theme color, the setThemeColor() method is used.
themeColorCSSString: The default color that is used on the theme (default value: #00c73c)
backgroundCSSString: the background color for the tab menu (default value: #44484e). It is recommended that you use the default value.
Caution Do not apply alpha values for the CSS color value.
Correct example:
#ff9800Incorrect example:
#e2ff9800
The following is an example of changing the theme color.
Change resource image
The resource image that is included in Naver cafe plugin library can be changed as indicated below.
Android
The resource image that is included in Naver cafe plugin library from Android environment can be changed as indicated below.
Unzip the Naver cafe plugin library file (.aar file).
Change the image in the /res/drawable-xhdpi folder to the desired image.
Compress the unzipped folder to a library file (.aar file).
Apply the new Naver cafe plugin library to build the project.
Caution When changing the image, the new image's size should be identical with the previous image.
iOS
The resource image that is included in Naver cafe plugin library in an iOS environment can be changed as indicated below.
Change the image in the NaverCafeSDK.bundle package to the desired image.
Apply the new package to the Naver cafe plugin library and build the project.
Caution When changing the image, the new image's size should be identical with the previous image.
Naver login
Enable login with Naver ID in the application.
GLinkNaverId.cs file is used for Naver login function.
init() method
Use the following initialization information to initialize the Naver login functionality.
Client ID received when registering application on the login developer center using Naver ID
Client secret received when registering application on the login developer center using Naver ID
The following is an example of initializing the Naver login function.
login() method
Login with Naver ID.
로그인 완료 후 리스너가 호출된다.
Android
Listener is requested after login is complete.
iOS
The following is an example of calling listener after login is complete in iOS environment.
logout() method
isLogin() method
Check login status.
getProfile() method
Search for logged in user’s basic information (mail address, nickname, profile picture, birthday, age). GLinkNaverId.sharedInstance().getProfile();
Register listener for the information you wish to search for.
Android
The following is an example of listener that searches for user basic information in Android environment.
iOS
The following is an example of listener that searches for user basic information in iOS environment.
Last updated